Another great audiobook app for anyone who uses Android or iOS devices is the Dolphin EasyReader App.
Download the app and create an account, if you don’t already have one.
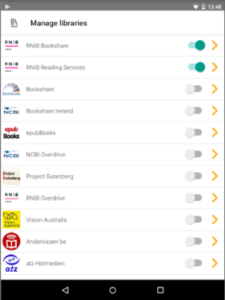
How do I find books? Once you log in to the app, click the ‘Navigator’ or ‘Library’ icon at the top left of the screen. In the Manage Libraries menu, click ‘Bookshare.’ From here, you will be asked to sign in to your Bookshare account. Now you can search for books in the ‘Manage Libraries’ search bar or you can search for books by category.
My Libraries section
How do I download a book? Simply click the ‘Download’ button and wait. Once the download is complete, click ‘Open.’ It’s that simple!
How do I listen to a book? This app is compatible with iOS VoiceOver, iOS supported Braille displays, Android TalkBack, and Android BrailleBack. To access these, go to the Audio Settings in the app. Here, you can change the reader voice.
Can I read about a book before deciding to download it? Yes! Click on any book you might be interested in reading to see more information about it.
Accessing your online textbooks doesn’t have to be a hassle! If you use Bookshare and have a Mac or Windows laptop/computer, you can use VitalSource to read your textbooks. Here’s how:
Download the Bookshelf app. This app is available for iOS, Android, Kindle Fire, Mac, PC, and Chromebook.
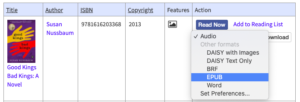
Download the book from Bookshare. After logging on to your Bookshare account, search for the book you want to read, open the download format drop-down menu, and select ‘EPUB.’ Hit ‘Download’ and your compatible book will begin downloading to your device. This will open your ‘My History’ page. Click the link next to your book to save it to your device.
How to download EPUB file of book
Open the book on Bookshelf. Open the Bookshelf up and click ‘File’ then ‘Open.’ Select the EPUB file of the book you have just downloaded and it should open up for you in Bookshelf.
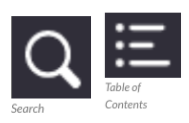
Search through your book. Click the Search icon, then type any keywords you are looking for to find them in your book. Click the Table of Contents icon to navigate to any certain part of the book.
Listen to the book. Use the toolbar at the top of the screen to have the book read aloud. Click ‘Start Reading’ to begin and ‘Stop Reading’ to stop.
*According to the VitalSource website “Text to Speech functionality may not work for all VitalSource titles.” You should contact support if you have any issues with your ebook.
Read through the Bookshelf Overview. This resource serves as a great guide for anyone who is new to using Bookshelf to read their books. It explains how to open and search through your books, as well as how to highlight and take notes. You can also review your notes to study for tests and quizzes!
How do I download a book from Bookshare to my MacBook? After logging on to your Bookshare account, search for the book you want to read, open the download format drop-down menu, and select ‘EPUB.’ Hit ‘Download’ and your compatible book will begin downloading to your device. This will open your ‘My History’ page. Click the link next to your book to save it to your device.
How to download EPUB file of book
How do I open the book on iBooks? After downloading your EPUB file, select that file and press command + O to open it in iBooks on your laptop/computer.
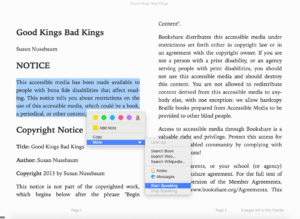
How do I get iBooks to read my book aloud? Select the text that you want to be read, right click, and select ‘More’ then ‘Start Speaking.’ You could also use the screenshot reader feature on Read & Write to select a page or paragraph, then click Play to listen.
Getting iBooks to read aloud
How do I get iBooks to stop reading my book aloud? Right click and select ‘More’ then ‘Stop Speaking.”
USING IBOOKS ON iOS
How do I download a book from Bookshare to my iPad? After logging on to your Bookshare account, search for the book you want to read, open the download format drop-down menu, and select ‘EPUB.’ Hit ‘Download’ and your compatible book will begin downloading to your device. This will open your ‘My History’ page. Click the link next to your book to save it to your device.
How do I open the book on iBooks? After downloading your EPUB file, click the ‘Open in iBooks’ button to open it in iBooks on your iPad.
How do I get iBooks to read my book aloud? Go to ‘Settings’ on your device. Click ‘General’ –> ‘Accessibility’ –> ‘Speech.’ Enable these three features: ‘Speak Selection,’ ‘Speak Screen,’ and ‘Highlight Content.’ Open the iBooks app. To read an entire page, swipe down the screen with two fingers. To read a specific paragraph, tap and hold the text to highlight it, then click ‘Speak.’
How do I get iBooks to stop reading my book aloud? Click the ‘Pause’ button.
Using Bookshare on a computer or laptop means you have access to the Bookshare Web Reader! Read on to learn about how to navigate and use this resource.
Which browsers does the Bookshare Web Reader work with? Google Chrome, Safari, Chromebook, Mozilla Firefox, and Internet Explorer.
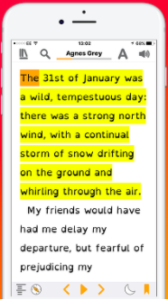
How do I read a book with the web reader? Log into Bookshare on a compatible browser, then search for the book you want to read. Click “Read Now” and wait a moment for the reading to load. Click “Play” to hear your reading.
Can I save my spot in a book? Yes! Your device constantly saves whatever place you’re at while you read. Just remember that this won’t work across multiple devices. So if you start reading a book on your laptop, then switch to your phone, Bookshare won’t remember where you were.
How do I go back to a saved spot in a book? Log into Bookshare, then click “History.” Find the book you’re looking for and click “Read Now” to open the book to where you left off. Click “Play” to resume the reading at the top of the current page.
What do all of the buttons on the web reader mean? Each button is listed below, followed by a picture that shows them all. You can use these features either by pressing the corresponding buttons or by using the keyboard shortcuts, shown in parenthesis, next to each feature below.
Table of Contents (T) – Takes you to the table of contents in the book you are reading.
Previous (2) – Go back one page.
Next (1) – Go forward one page.
Play (P) – Begin reading audio aloud.
Settings (O)
Night Mode On/Off (N) – Changes brightness of screen.
Full Screen On/Off (F) – Changes size of screen.
Help (H) – Use this for any questions.
Show/Hide Toolbar (X)
Wed Reader buttons
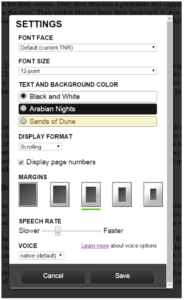
Can I customize the visual settings? Of course! Click Settings on the toolbar to change the font, font size, text color, background color, display format, and margins.
What about the audio settings? You can customize those too! Click Settings on the toolbar to change the reader’s voice and the speed at which they read.
Visual and audio settings
What is this BeeLine Reader feature? Another great part about Bookshare is their BeeLine Reader feature which helps you keep track of which line you are on as you read. It does this by applying a color gradient to the text, helping to separate each line from the ones above and below it. Select a book on your Bookshare account and then click ‘Read Now’ to open the Web Reader. Go to the Web Reader Settings to activate BeeLine Reader and then customize your settings from there. Make sure to click ‘Save’ once you set your preferences!
For more information or to learn about Bookshare in a different format, consider watching this video.
Read&Write, while incredibly useful, can seem a bit overwhelming at first. There are lots of features and customizations to make – it can be daunting when you first get started. Our hope is that this guide can serve as a quick reference for anyone learning to use Read&Write.
**Scroll to the bottom of this post to see what these symbols looks like!**
Reading a scannable document
Text to Speech: Reads text for you. Place your cursor next to whatever part of the document you want to read. Then click the play button icon.
Talking Dictionary: Provides written definitions of unknown words. Highlight whatever you want to define. Then click the dictionary icon.
Picture Dictionary: Provides visual definitions of unknown words. Highlight whatever you want to define. Then click the picture dictionary icon.
Highlighters: Highlights any amount of text. Select (highlight) whatever you want to highlight. Then click the corresponding highlighter color.
Reading any other document
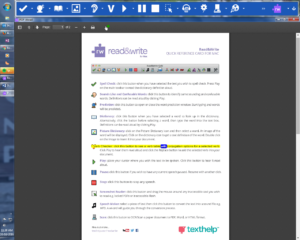
Screenshot Reader: Allows you to read parts of a website without having to have a browser extension. Also allows you to read inaccessible documents that can’t be scanned. Click the screenshot icon and drag a box around what you want to read. This sometimes takes a moment to load. You can replay the text by clicking the play button on the bottom right corner (instead of having to reselect the area of text).
Customizing your reading experience
Settings: Change the reading voice, speed, language, and more. I recommend playing around with different voices to see which one works best for you. Click the settings icon to access all of these customizable features.
Bookshare is a very helpful tool for anyone who needs or prefers audiobooks to physical ones. Getting started can be a bit overwhelming, so here are some tips for using Bookshare on all of your devices!
On your computer or laptop
If you use Windows you can read through the Bookshare Web Reader or Open Lore Reader.
If you use Apple you can read through the Bookshare Web Reader or the iBooks application.
If you use a Chromebook you can read through the Bookshare Web Reader or the Capti Voice application.
On you tablet or smartphone
If you use an Android you can use Dolphin EasyReader, Voice Dream Reader, or Go Read.
If you use iOS you can use Dolphin EasyReader, Voice Dream Reader, or Capti Voice.
If you use a Kindle or other e-book reader you can use any Bookshare compatible apps. Kindles don’t have any of these apps but you can still read your Bookshare books on them!
As more and more professors assign online homework, we will occasionally come across sites that are not accessible. Rather than offer homework in a standard text format, a publisher may present words as part of an image, in a video, in Flash, or in a format that allows students to drag and drop homework answers. Unfortunately, standard text-to-speech software used by students with dyslexia often cannot read words presented in these inaccessible formats.
Read&Write, however, has a tool that can recognize any text on the screen and read it aloud to the user. Screenshot Reader allows users to draw a box around inaccessible text on the screen and have that text read aloud. And if you are SUNY Cortland student, faculty, or staff, you can get Read&Write for free.
See the below videos on how to use Screenshot Reader on Mac and Windows PCs. As always, give us a shout if you need further assistance.
At SUNY Cortland, our faculty are responsible for providing accessible electronic readings for all students who need them for equal access. I’ve worked closely with the faculty on this for several years now and I’m pleased with the number of faculty who post quality accessible files on Blackboard.
Nevertheless, a stray inaccessible file will occasionally be posted. Maybe a student hasn’t identified yet or maybe a professor just forgot to check to make sure that one PDF is searchable. In cases like this, we ask students to call the matter to the attention of the professor so they can fix the error and let me know if the situation repeats.
But what if you want to just read that one document and be done with it? If you have Read&Write installed on your computer, you have the tools in front of you to make that PDF accessible.
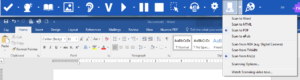
Open Read&Write, go to the drop down menu next to the Scanner button and choose “Scan from file(s)…” (The below screenshots are from Windows, but Read&Write for Mac will work similarly.)
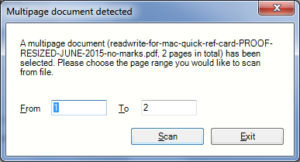
Then hit the big “Scan” button. It will prompt you to open a file from your computer. Find the file you want to read and choose it. If it is a file with multiple pages, Read&Write will ask you to choose which pages to recognize. When ready, hit “Scan.”
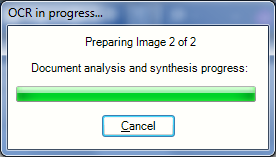
Read&Write will show you the progress of recognizing each page of the document. It takes a second or two to recognize the text on each page.
The document will then open in PDF Aloud, allowing you to listen while the words are highlighted.
This will work if you want to use Read&Write to read a paper document as well. Just take a picture of it with your phone, transfer it to your computer, and follow the above steps. (If you use OfficeLens, though, it will recognize the text on its own.) If you have a scanner, you can scan the paper document as this video demonstrates.
We are excited to announce that SUNY Cortland has purchased a site license for Read & Write, a suite of reading, writing, and study tools for PC and Mac. The suite can be installed on any college computer and students may install it on their own computers.
Read & Write opens as a toolbar that hovers over everything else open on your computer or can be locked to the top or side of the screen, as seen below.
The toolbar allows the user to access the 30 or so features of the suite. It can be customized to allow users to focus on the handful of features they find most helpful. These features includes the following apps:
A text-to-speech app that highlights text while reading it aloud;
A scan and read app that allows the user to create searchable PDFs and other documents that can be read aloud;
PDF Aloud, an app that opens PDFs and reads them aloud;
Screenshot Reader, an app that allows the user to take a screenshot of part or all of the screen and then have it read aloud. This will be handy for students who want to have online homework read aloud and have been stymied by inaccessible Flash-based text.
A DAISY reader that allows students to read Bookshare and other DAISY files;
Speechmaker, an app that creates mp3 files out of text.
Study tools that can be useful for those doing reading and research with electronic documents, including several colors of highlighters and an app that inserts voice notes;
Writing tools, including a word predictor and an app that helps the writer sort through homophones and other confusable words;
An app that allows the user to graphically organize ideas;
And more…
The toolbar includes drop-down menus to customize each app and view video tutorials of each feature, making them relatively easy to learn. That said, we will highlight some of the most useful features of Read & Write in future posts.
You may learn how to obtain a copy of Read and Write for your college-owned computer or your own computer at no charge by contacting Jeremy Zhe-Heimerman. In the future, we hope to publish a link that will allow any member of the SUNY Cortland community to download the software directly.
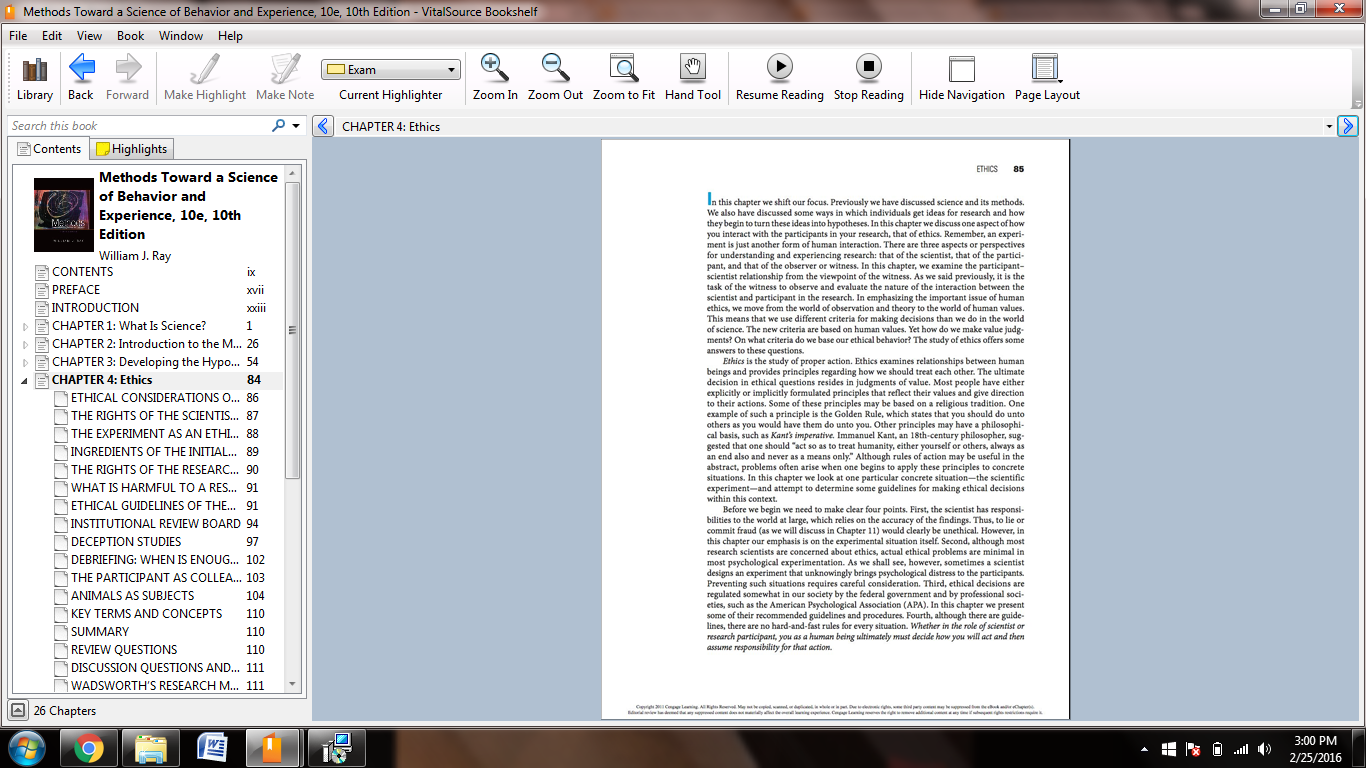
I spent time this week working with a student who wanted to use the text-to-speech feature on her VitalSource e-textbook.
Those of us who work with disabled students in higher education have learned to be skeptical of e-textbooks. The combination of piracy-wary publishers and indifferent platform creators has resulted in most e-books being inaccessible to students with dyslexia and others who require text-to-speech for equal access. When I last tried VitalSource’s platform (back when it was CourseSmart), there was a way for many books to be read aloud through text-to-speech, but it was cumbersome to say the least. A look at VitalSource’s new platform shows some limited improvement.
Use of text-to-speech in a VitalSource book requires downloading and installing their Bookshelf desktop app. I worked with my student’s PC laptop, but a Mac app is available as well. Once installed, the student can open the book, easily navigate to the desired page, and click on the play button to start reading.
There are plenty of downsides to VitalSource books, though.
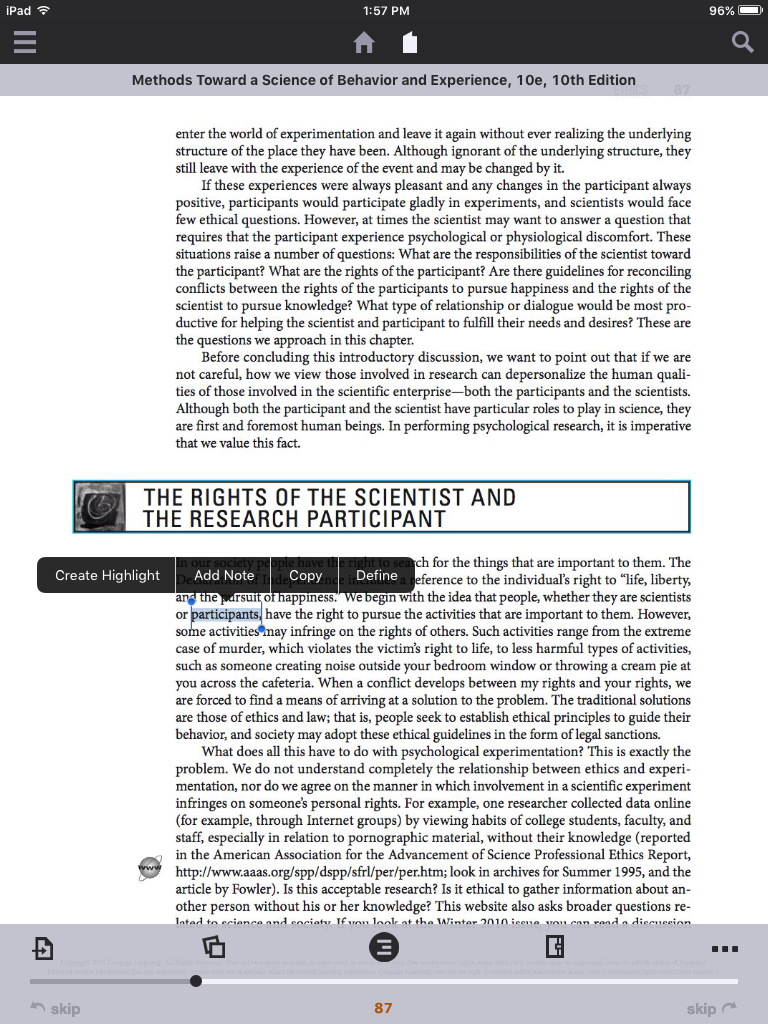
Words are not highlighted while being read aloud. This makes it tougher for the reader to follow along.
Text-to-speech is not available in the web app.
There is no text-to-speech function in the iOS app and, as seen below, Speak Selected Text does not work either.
One day, students will be able to buy completely accessible ebooks. For now, the VitalSource desktop app may be acceptable to some users, but it, along with the rest of the ebook industry, falls short of offering equal access.