Tag Archives: writing

VitalSource for textbooks through Bookshare

Accessing your online textbooks doesn’t have to be a hassle! If you use Bookshare and have a Mac or Windows laptop/computer, you can use VitalSource to read your textbooks. Here’s how:

Download the Bookshelf app. This app is available for iOS, Android, Kindle Fire, Mac, PC, and Chromebook.

iOS, Android, Kindle Fire, PC, and Chromebook logos

Create an account, if you don’t already have one.

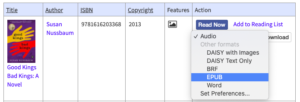
Download the book from Bookshare. After logging on to your Bookshare account, search for the book you want to read, open the download format drop-down menu, and select ‘EPUB.’ Hit ‘Download’ and your compatible book will begin downloading to your device. This will open your ‘My History’ page. Click the link next to your book to save it to your device.

Screenshot of page when trying to download a book as an EPUB file.
How to download EPUB file of book

Open the book on Bookshelf. Open the Bookshelf up and click ‘File’ then ‘Open.’ Select the EPUB file of the book you have just downloaded and it should open up for you in Bookshelf.

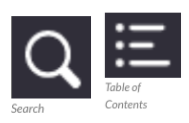
Search through your book. Click the Search icon, then type any keywords you are looking for to find them in your book. Click the Table of Contents icon to navigate to any certain part of the book.

Search and Table of Contents icons

Listen to the book. Use the toolbar at the top of the screen to have the book read aloud. Click ‘Start Reading’ to begin and ‘Stop Reading’ to stop.

*According to the VitalSource website “Text to Speech functionality may not work for all VitalSource titles.” You should contact support if you have any issues with your ebook.

Read through the Bookshelf Overview. This resource serves as a great guide for anyone who is new to using Bookshelf to read their books. It explains how to open and search through your books, as well as how to highlight and take notes. You can also review your notes to study for tests and quizzes!


Getting to Know Read&Write

Read&Write, while incredibly useful, can seem a bit overwhelming at first. There are lots of features and customizations to make – it can be daunting when you first get started. Our hope is that this guide can serve as a quick reference for anyone learning to use Read&Write.

While I will only be referencing a few main features here, feel free to visit this page filled with user guides for every device and  this guide specifically for Read&Write on Chrome


**Scroll to the bottom of this post to see what these symbols looks like!**


Reading a scannable document

  • Text to Speech: Reads text for you. Place your cursor next to whatever part of the document you want to read. Then click the play button icon.
  • Talking Dictionary: Provides written definitions of unknown words. Highlight whatever you want to define. Then click the dictionary icon.
  • Picture Dictionary: Provides visual definitions of unknown words. Highlight whatever you want to define. Then click the picture dictionary icon.
  • Highlighters: Highlights any amount of text. Select (highlight) whatever you want to highlight. Then click the corresponding highlighter color.

Reading any other document

  • Screenshot Reader: Allows you to read parts of a website without having to have a browser extension. Also allows you to read inaccessible documents that can’t be scanned. Click the screenshot icon and drag a box around what you want to read. This sometimes takes a moment to load. You can replay the text by clicking the play button on the bottom right corner (instead of having to reselect the area of text).

Customizing your reading experience

  • Settings: Change the reading voice, speed, language, and more. I recommend playing around with different voices to see which one works best for you. Click the settings icon to access all of these customizable features.

Keep in mind that along with downloading the Read&Write software for your device, you can also download it to your Google Chrome web browser so you can read straight from websites. Click here to download the Read&Write extension for Google Chrome. You can also watch video guides on YouTube!

If you’re not sure which tools might be most helpful for you, visit the Tools for Specific Populations page

Play button icon for Text to Speech Feature
Text to Speech
Dictionary icon for Talking Dictionary feature
Talking Dictionary
Picture Dictionary icon
Picture Dictionary
Highlighter icon
Highlighter
Settings icon
Settings

Read and Write

text-help

We are excited to announce that SUNY Cortland has purchased a site license for Read & Write, a suite of reading, writing, and study tools for PC and Mac. The suite can be installed on any college computer and students may install it on their own computers.

Read & Write opens as a toolbar that hovers over everything else open on your computer or can be locked to the top or side of the screen, as seen below.

Screenshot of Read & Write toolbar locked to the top of a screen.

The toolbar allows the user to access the 30 or so features of the suite. It can be customized to allow users to focus on the handful of features they find most helpful. These features includes the following apps:

  • A text-to-speech app that highlights text while reading it aloud;
  • A scan and read app that allows the user to create searchable PDFs and other documents that can be read aloud;
  • PDF Aloud, an app that opens PDFs and reads them aloud;
  • Screenshot Reader, an app that allows the user to take a screenshot of part or all of the screen and then have it read aloud. This will be handy for students who want to have online homework read aloud and have been stymied by inaccessible Flash-based text.
  • A DAISY reader that allows students to read Bookshare and other DAISY files;
  • Speechmaker, an app that creates mp3 files out of text.
  • Study tools that can be useful for those doing reading and research with electronic documents, including several colors of highlighters and an app that inserts voice notes;
  • Writing tools, including a word predictor and an app that helps the writer sort through homophones and other confusable words;
  • An app that allows the user to graphically  organize ideas;
  • And more…

The toolbar includes drop-down menus to customize each app and view video tutorials of each feature, making them relatively easy to learn. That said, we will highlight some of the most useful features of Read & Write in future posts.

You may learn how to obtain a copy of Read and Write for your college-owned computer or your own computer at no charge by contacting Jeremy Zhe-Heimerman. In the future, we hope to publish a link that will allow any member of the SUNY Cortland community to download the software directly.


Siri and Dragon Dictation for College Students

Many of us know about how Siri can allow a user to give your iOS device voice commands. People with visual disabilities and limited mobility rely on Siri quite a bit, as they can’t interact with their devices as readily in other ways. But Siri and dictation apps like Dragon Dictation are also quite valuable for college students who want to write notes or papers on their devices.

dragon      siri

Many students think better while speaking than while writing or typing. Students with dyslexia or dysgraphia might find it especially difficult to concentrate on content, style, or structure when it can be a chore just to get the words out properly by hand. If you are such a person, you may wish to take notes or write papers by dictating.

Dragon Naturally Speaking, by Nuance, is an application that has been available for PCs and Macs for years. It’s voice recognition capabilities have allowed busy people like doctors and lawyers as well as people with disabilities to dictate their writing to their computers. In the past, Dragon Naturally Speaking required a lengthy training process for the software to learn the voice of the user. High quality microphones needed to be used in consistently the same way for accurate results. Voice recognition has come such a long way, however, that recent versions of Dragon Naturally Speaking and similar apps on mobile devices are highly accurate (although not perfect) upon first use.

Dragon Dictation is Nuance’s iOS app. It’s essentially a bare-bones note-taking app. When starting a new note, one taps the red button and dictates the note. It’s best to speak relatively close to the microphone.

Commonly used voice commands are found by tapping the “i” icon at the bottom right.

20150310_144708000_iOS

One may bring the keyboard up to edit the note within the app.

20150310_144358000_iOS

When finished, one may email, cut or copy, Tweet, or Facebook the note, allowing one to export the note into other apps for further editing or publication.

20150310_144136000_iOS

While Dragon can only be used within its own app, Siri allows one to dictate seamlessly into most any app that allows text input. When the keyboard comes up, just tap the microphone button next to the space bar and dictate away. Tap done when finished and edit using the keyboard if you wish. Here it is in Microsoft Word.

20150310_145620000_iOS

While accuracy wasn’t perfect for me with either Siri or Dragon, it was good enough to give me a first draft to work with.

Since Dragon Dictation is free, Siri comes built into iOS, and both are easy to use and learn, it’s worth trying these out to see if they work for you.

Have you dictated notes or papers? Do you have any tips for others to do the same?

Dyslexie

Dyslexie is a new typeface that was designed to make reading easier for people with dyslexia. It was created by a Dutch designer named Christian Boer, who has dyslexia. He understood that he had trouble discriminating between letters because most fonts are uniform; Boer designed a font with letters that are distinctive and, therefore, easier to tell apart.

Dyslexie-font

Recently, Dyslexie became available for free download. Once downloaded, the font can be used for typing and reading on your computer, as well as for printing. Once you request your free download, you’re emailed a manual that tells you how to download the font to your particular system.

So is this new font really helpful? SUNY Cortland student Andy Hoffman thinks so:

Reading had always been a challenge for me.  I often don’t read anything for long lengths of time just because I’m deciphering between words and often have to go back to reread something in order to understand its true meaning.  I would often think that it is a disadvantage because it would take me twice as long to do homework as compared to someone else.  The typeface on many fonts may look different but all have the same texture to them.  They often don’t have differences between how they are written and, for someone who has dyslexia, it often creates problems.

I recently came around to this new font and started testing it out in various ways.  I couldn’t believe the differences in text faces.  It may be subtle but the texture of each word is framed in a way that makes it easier to make out each letter in a word.  The subtle different between an I and J in a different font might be hard to come by but in this font, words that look similar now have a difference that is easier to make out.  I highly recommend trying this font just for fun and see if it’s making a difference in your reading speed and understanding of the text.

Interested?  Download Dyslexie for free here: http://www.dyslexiefont.com/en/order/home-use/

Mac OSX Text-to-Speech

Many don’t realize that OSX includes a very useful text-to-speech tool. This one minute video nicely demonstrates how to use it.

This is a great tool to keep focus on reading a PDF when it’s hard to pay attention to the text. Or maybe you are writing a paper and need to hear your words read back to you while editing. There’s no need to seek out and purchase an app when this is built right into your operating system.

This feature is limited in that one must repeatedly select text and hit the keyboard shortcuts to listen. Additionally, each word is not highlighted while being read aloud. But it’s a perfectly adequate text-to-speech function that many of my students have been satisfied with over the years.